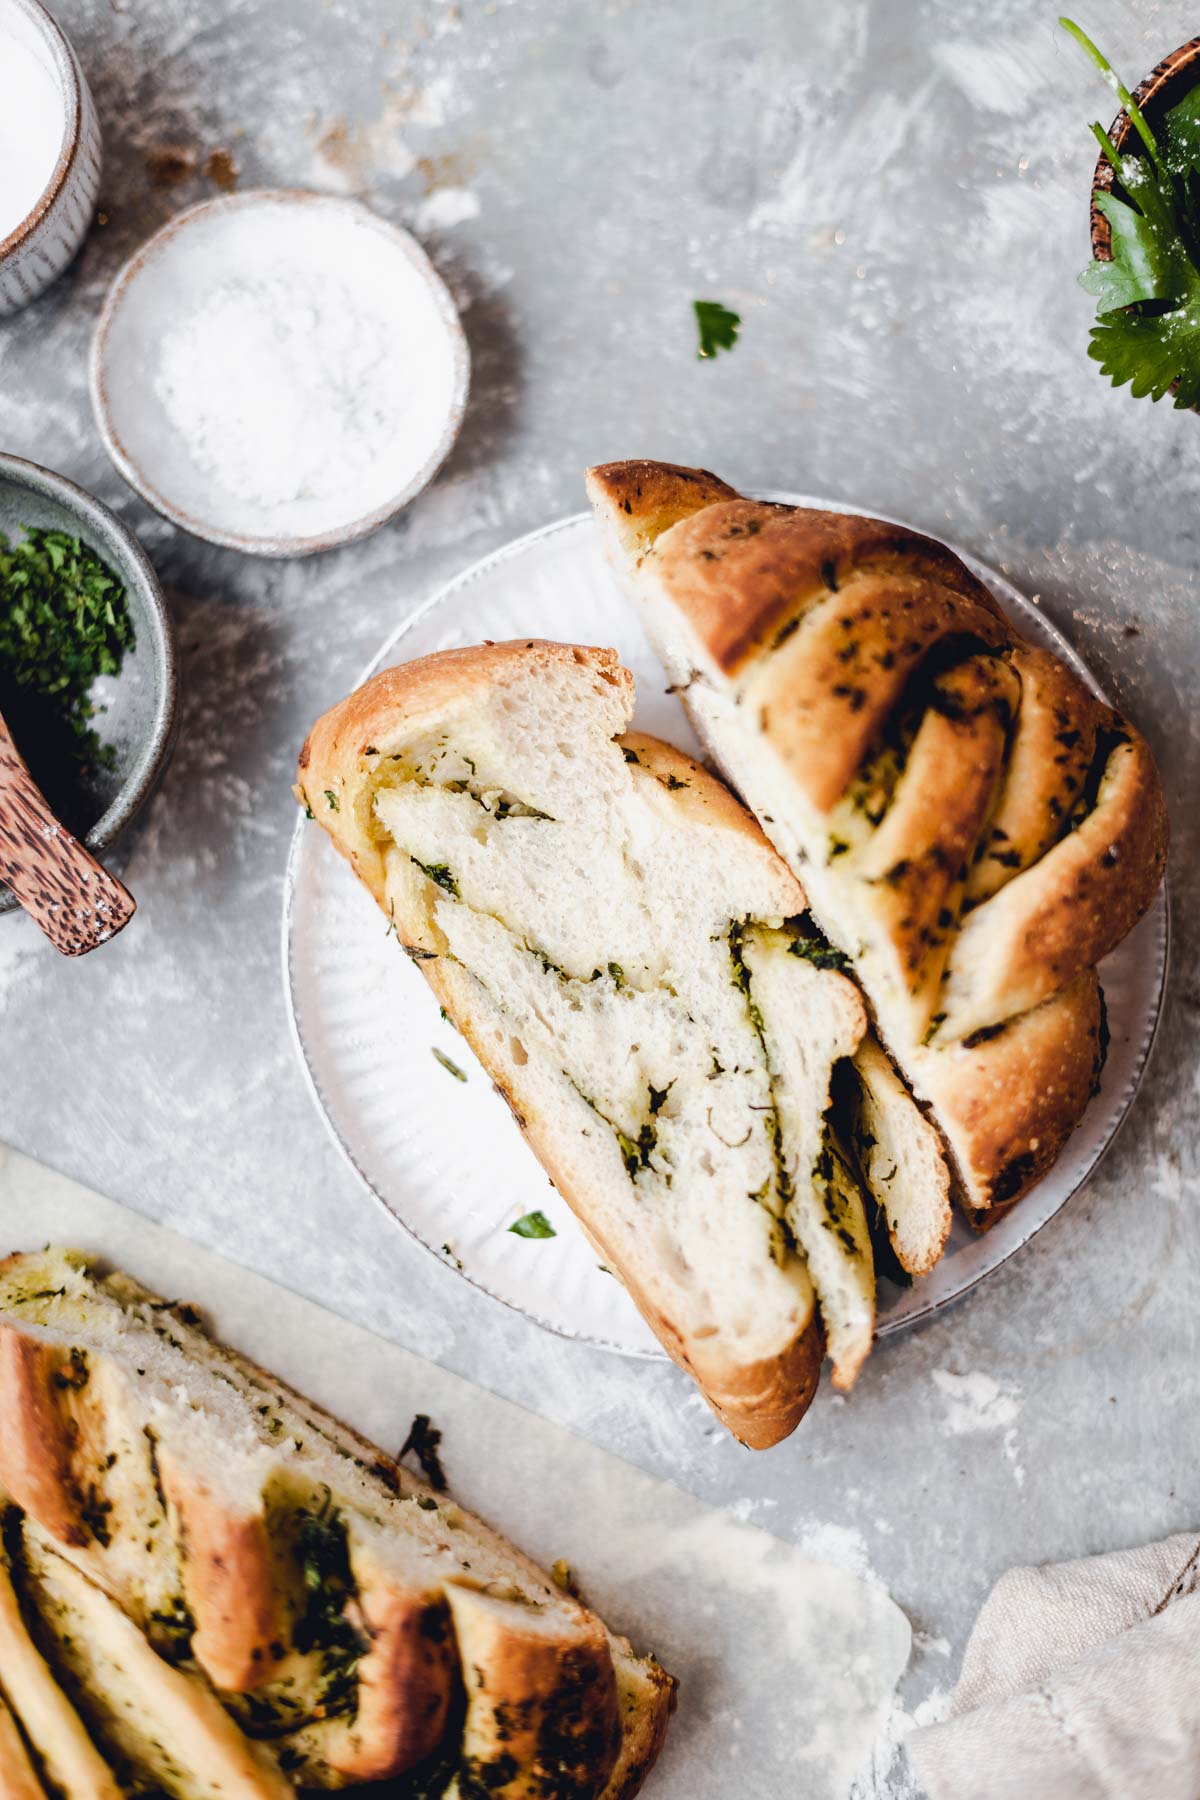
My vegan garlic herb bread is a showstopper like no other. It's gorgeous, but so easy to make you practically can't go wrong. Bursting with flavour and beginner friendly.

Why this recipe works
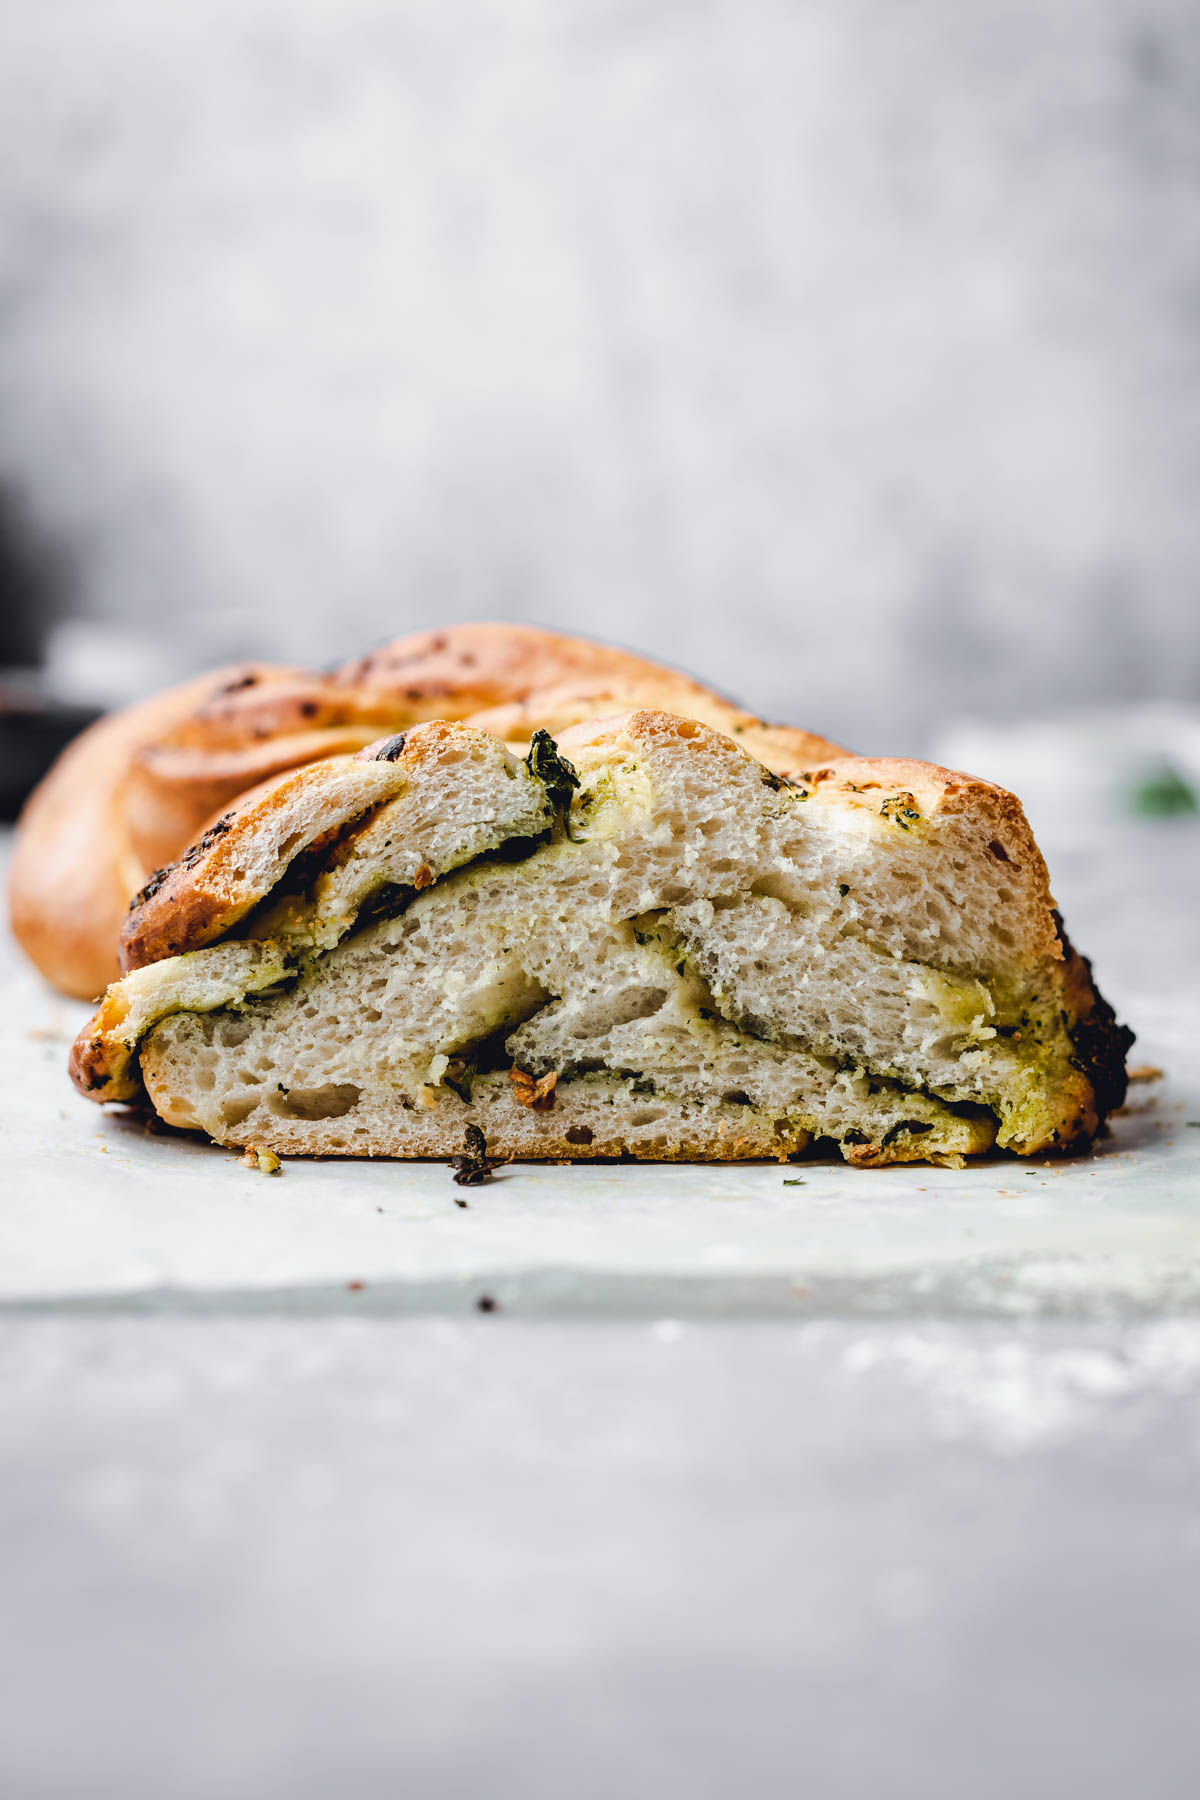
- The crunch of this bread is like no other.
- A real showstopper!
- A lot easier to make than it looks.
- So much better than store-bought garlic bread!
- Easily to customise (simply use any herbs you want)
You'll find full instructions including US and EU measurements below. But first, let's see what you'll need.
The Ingredients
To make your delicious vegan garlic herb bread you'll need:

A Few Ingredient Notes
Basil: I used fresh basil.
Coriander (cilantro in the US): I used fresh coriander.
Parsley and thyme: I used both of these dried.
Oil: I suggest using a light vegetable oil such as olive or sunflower oil.
Yeast: I used instant yeast (sometimes called quick-rise yeast or fast-acting yeast).
Step-by-step Instructions
This is a quick & foolproof visual guide through the recipe.
*A detailed (including measurements) recipe card that you can print is waiting for you at the bottom of this post.
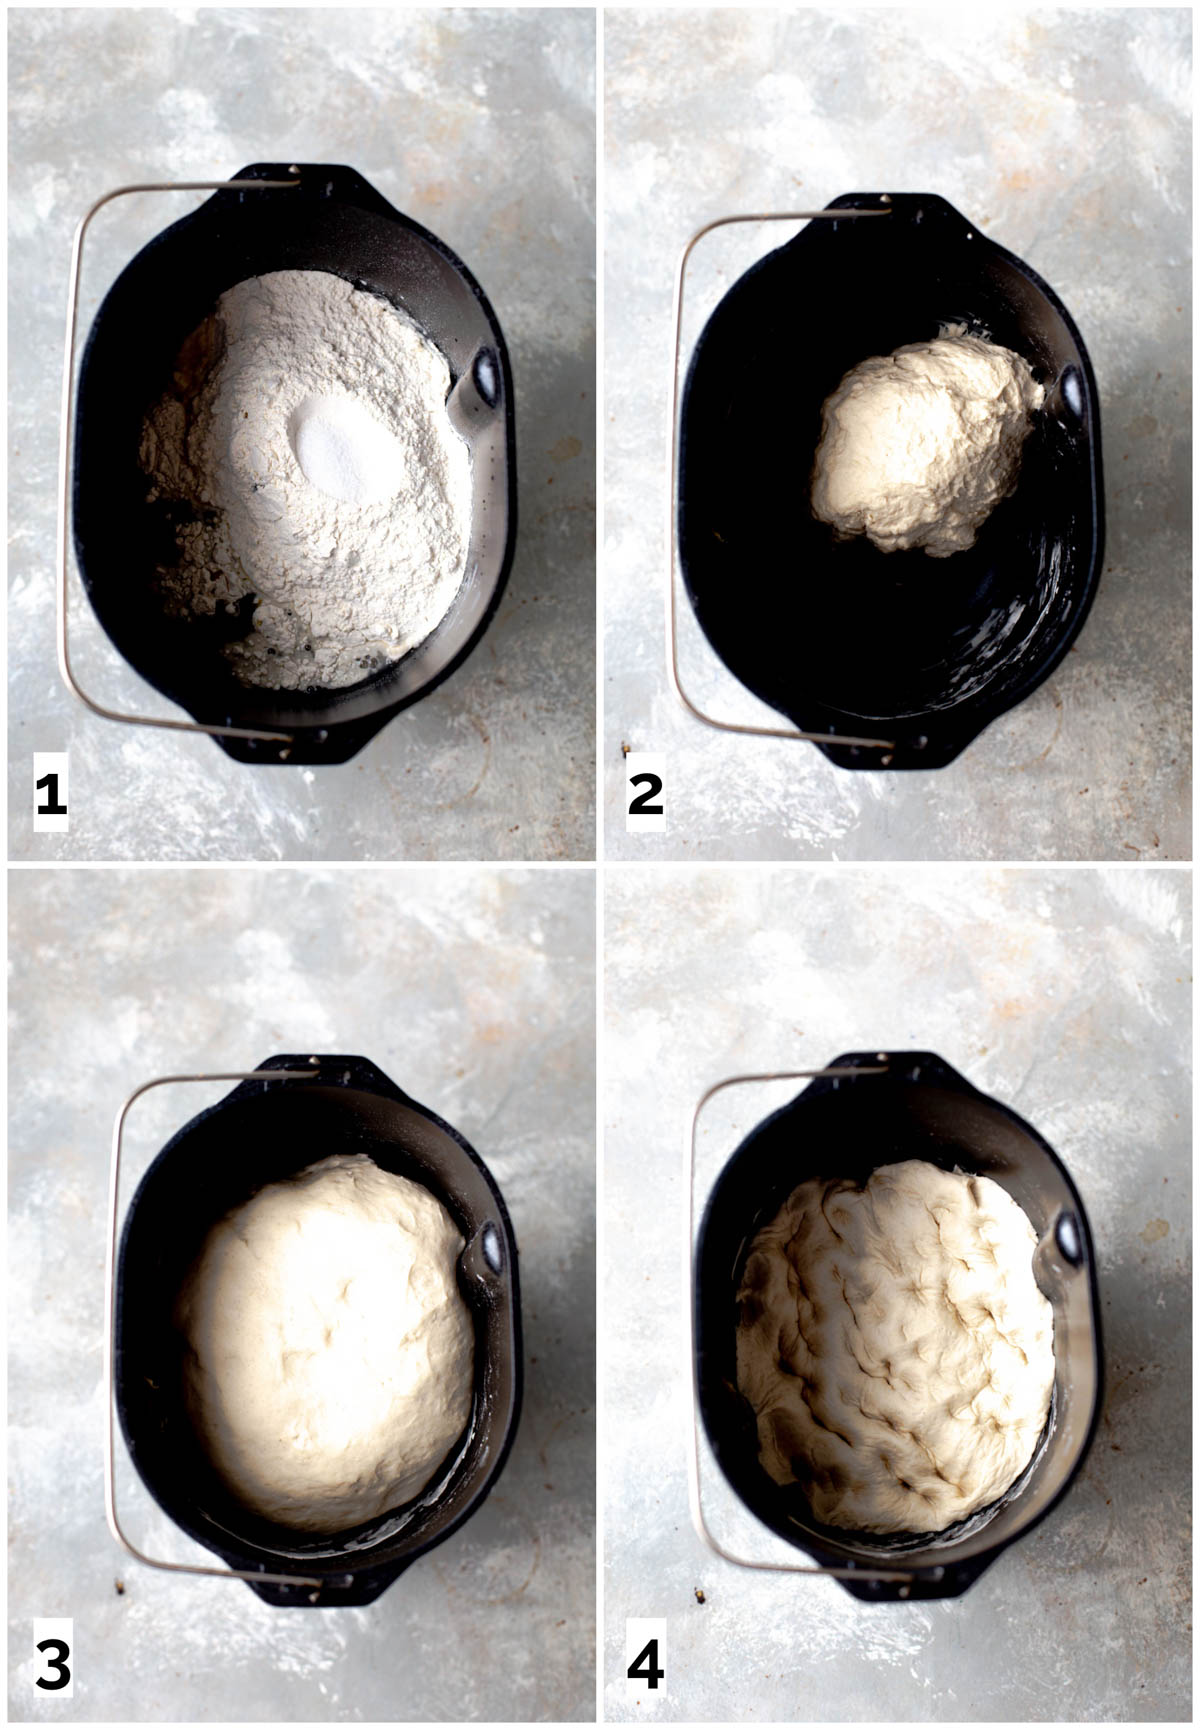
1. Combine the warm water and yeast in a large bowl. Add oil, then the flour, and lastly salt (on top of the flour).
2. Stir the mixture until it comes together to form a dough. Turn the dough and knead for 5-10 minutes until it springs back when touched.
3. Shape into a ball, cover and leave to rise for an hour (or until doubled in size). In the meantime, make your filling by mixing all the filling ingredients.
4. Once risen use your fists to knock the air out of the dough.
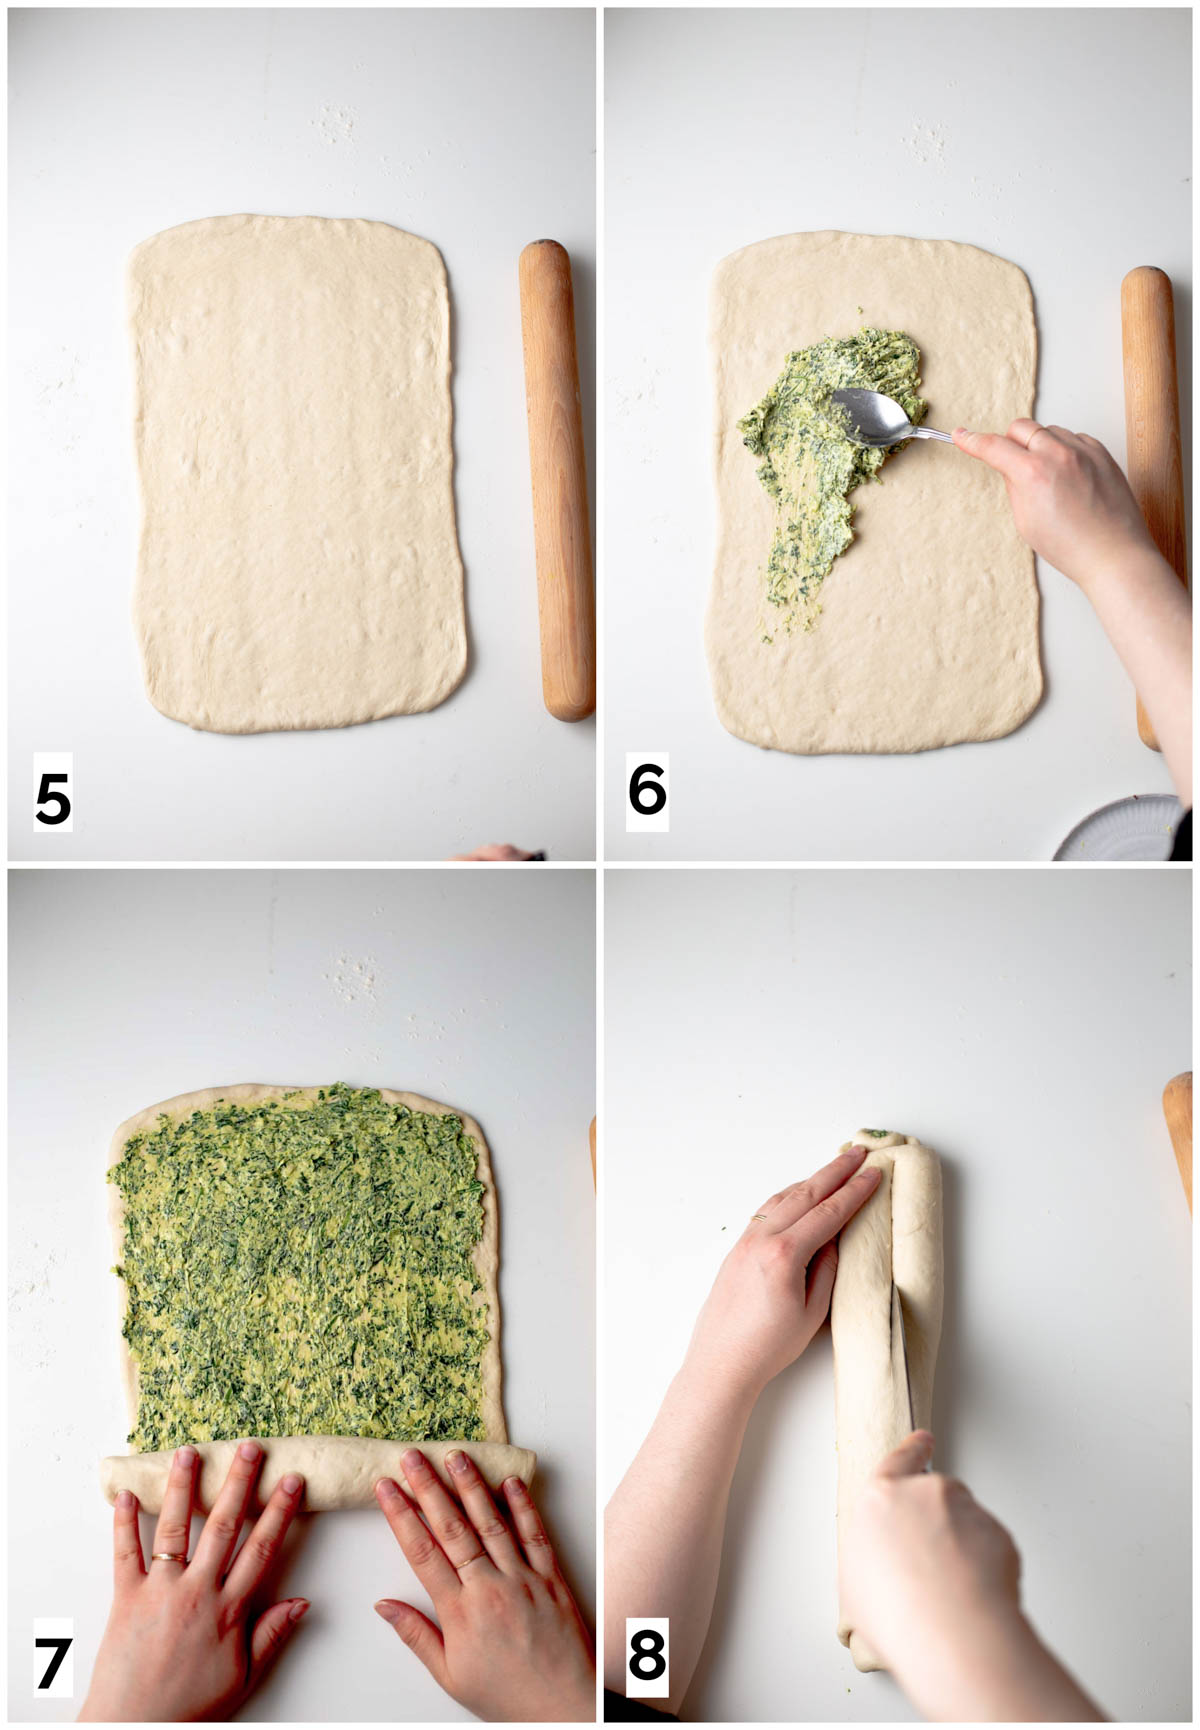
5. Use your hands to shape the dough into a rough rectangle. Then roll it out into a thin rectangle.
6. Divide the filling equally over the dough.
7. You want a thick and short roll so start rolling the dough on one of the short sides.
8. To twist your dough, cut a slit down the middle of the roll, leaving the top part uncut.
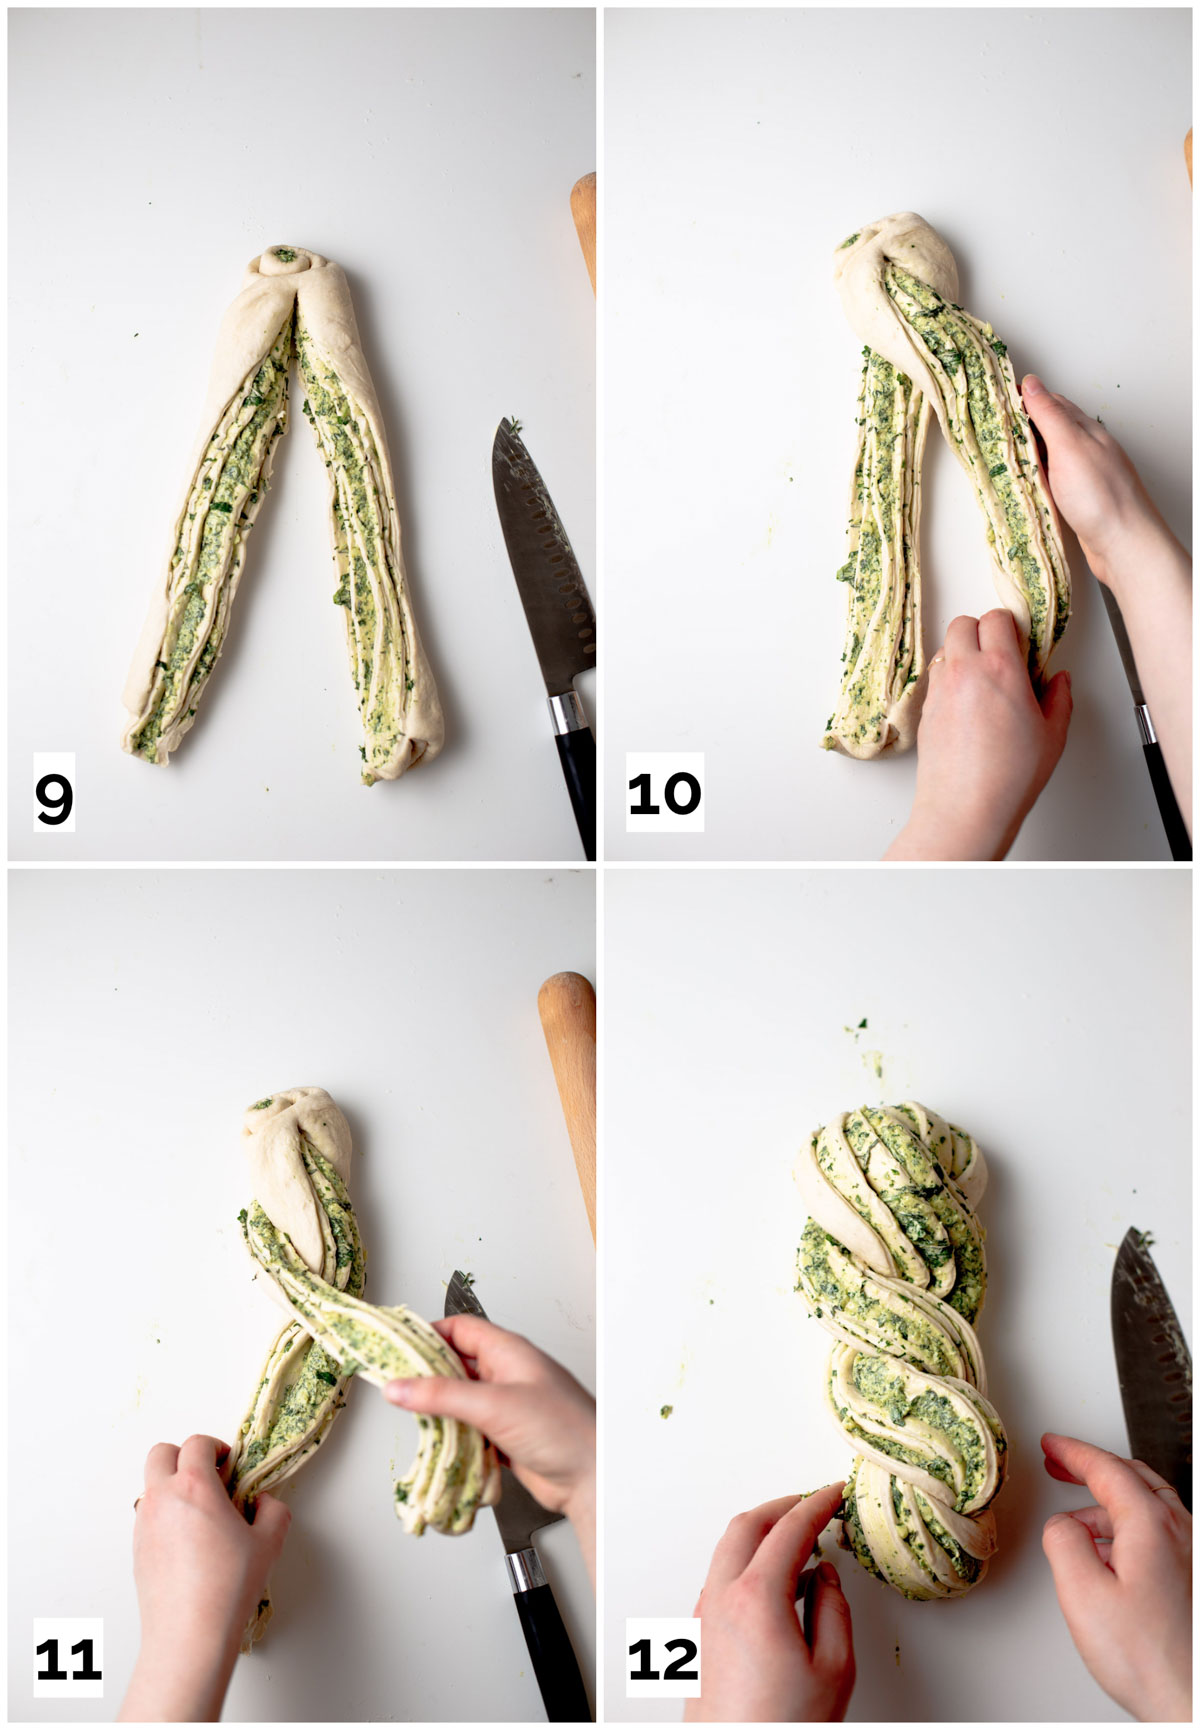
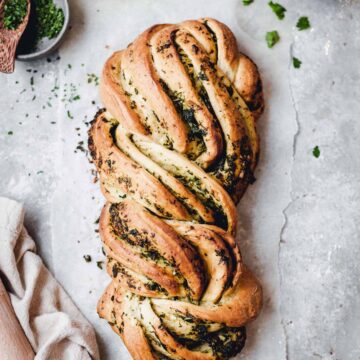
9. Turn the filling to the outside, revealing the herb paste dressing.
10. Fold one part of the roll over the other, keeping the filling exposed.
11. Repeat until you've reached all the way to the bottom.
12. Finish by pinching the two halves together and tucking the pinched part under the loaf.
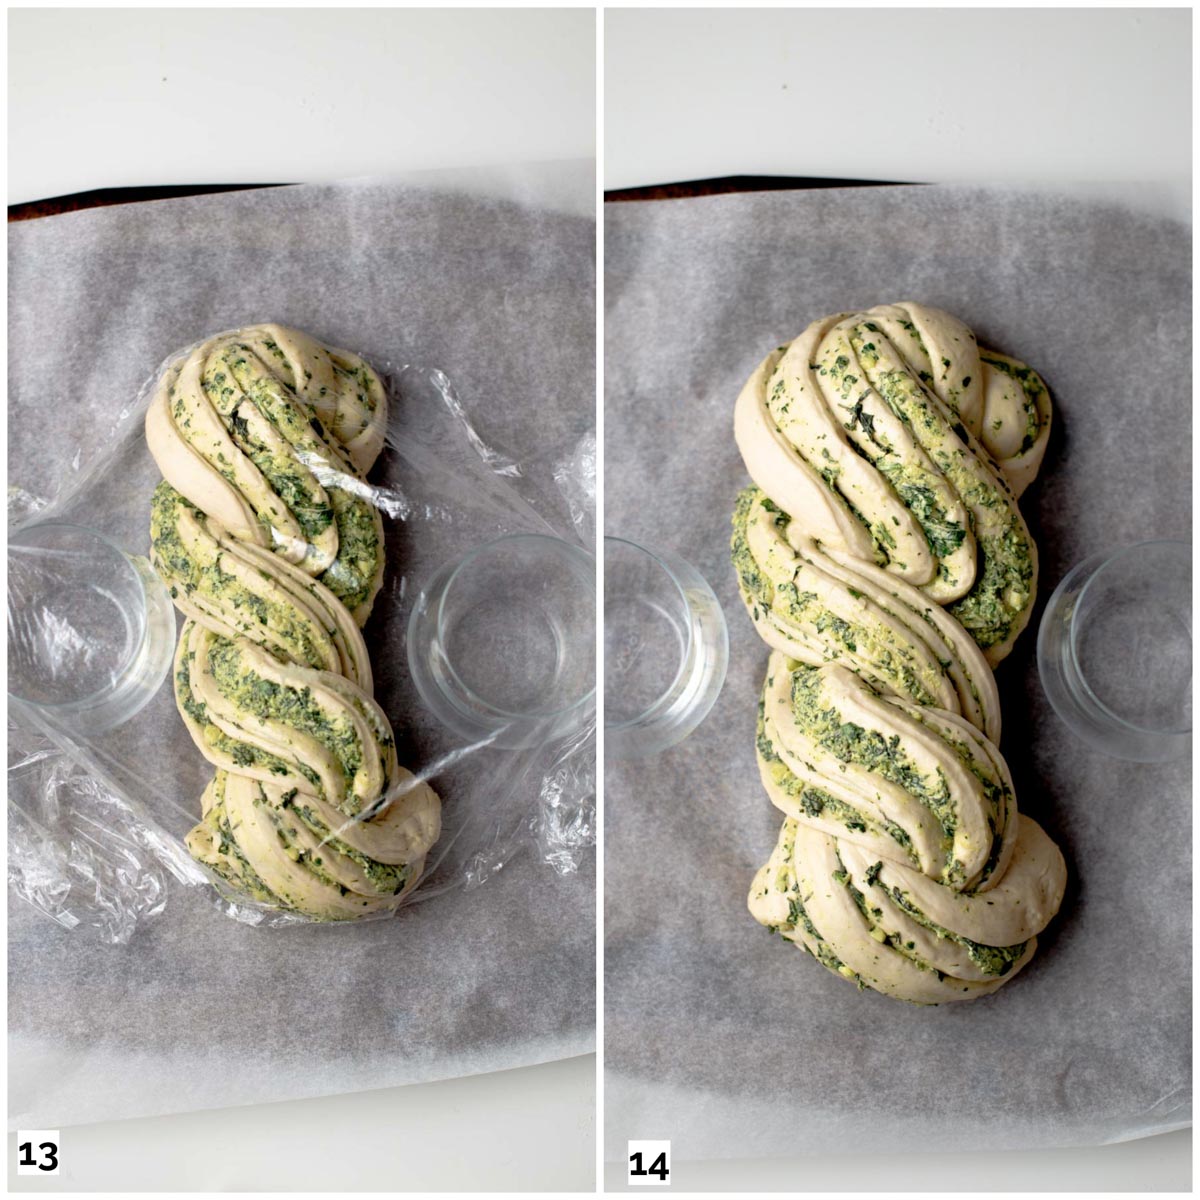
13. Cover with cling film (use glasses to hold up the cling film to prevent from touching the dough) for a final proof of 45 minutes.
14. Once the loaf has proofed (doubled in size) brush your loaf with almond milk and bake for 30-35 minutes at 190°C / 374°F (fan oven setting) until golden brown.
My Top Tips
1. Use bread flour
I can't stress the importance of this enough. This recipe simply won't work unless you use bread flour.
Wondering why? Bread flour is higher in protein and has better gluten development. This results in a fluffy, crunchy, well-shaped bread.
Plain flour, on the other hand, builds up less stretch in the dough and causes the dough to tear when baked.
2. Separate your yeast and salt
Salt will kill your yeast and inhibit the rise. This is why it's important to keep the yeast and salt separated until you form your dough.
3. Don't use hot water
Another yeast destroyer is hot water! Make sure to use lukewarm (not hot) water. The water should be warm to the touch, but not burning hot or cold.
Find out why hot water can kill yeast here.
4. Knead until the dough springs back
Another friendly tip from someone that's baked this exact bread a dozen times.
Make sure that you knead your dough for long enough. If your dough is under-kneaded, it will lose its distinct shape when baked.
To get that gorgeous twist, make sure to knead until the dough springs back when you press your fingers into it.
5. Pinch the end
The key to creating a lovely twist shape? The pinch and fold! By pinching and folding your dough at the bottom you will prevent it from unravelling in the oven.
FAQs
There are a few things that can prevent the dough from rising.
It usually means the yeast has been deactivated. High temperature can deactivate your yeast and inhibit the rise of the bread, so when you add your water make sure it's warm to the touch but not hot. If in doubt, always go for a bit colder rather than warmer.
Salt can also kill your yeast so make sure that your salt doesn't touch the yeast until you stir your mixture to form a dough.
A great way to ensure this is to first add the flour on top of the yeast. Then make a small well in the flour and pour the salt into that well.
The loaf can lose its twisty shape if the dough is too wet. This won't affect the flavour at all, but try adding a bit less water next time if you want a well-defined twist shape.
If you've added the exact amount of water and flour then your dough might be under-kneaded. This means the gluten in the bread is not strong enough to hold the twist shape.
Make sure to knead for longer next time. Knead until the dough springs back when you lightly press your finger against it.
This means your bread hasn't risen properly. A bad rise can happen when some or all of the yeast has been deactivated.
If your dough doubled in size after the first rise then your yeast was doing its job well. It might be the case the second rise wasn't long enough or might have been in a cold place.
Additionally, you might have over kneaded the dough the second time (when shaping your twist) which caused it to be too tense and prevented it from rising properly.
Store your loaf in an airtight container or bread tin for up to 4 days. Please do mind that this bread is by far the most delicious when eaten fresh, preferably on the first day.
Yes. Freeze after baking and save for up to a month. To serve simply take out of the freezer the night before and leave to thaw at room temperature.
Possible Ingredient Substitutions
Here are a few ways you could substitute the ingredients in this bread.
- Oil - Any light vegetable oil will work but use a good quality oil as you will get the flavour coming through.
- Almond milk - any plant milk will work for brushing so don't worry if you haven't got almond milk at hand. Tip: do make sure you're using unsweetened plant milk and avoid coconut milk due to it's strong taste.
- Basil and other herbs - not a fan of some of the herbs in this recipe? No problem. Don't feel obliged to use exactly the same herbs as the ones listed in the recipe. You can experiment with various other ones such as oregano and chives.
If you liked my vegan garlic herb bread, make sure to check out my other favourite bread recipes. Some of the most popular ones are the orange cardamom bun, blueberry knot buns and dinner rolls. Or you can check out my entire recipes section here.
Thanks for sticking with me until the end! Happy bread-making!
🍴Recipe
Vegan Garlic Herb Bread
EQUIPMENT
- Rolling Pin
- Baking paper and tray
- Kitchen scales or cup measurements
INGREDIENTS
FOR THE BREAD
- 205 ml (¾ cup (plus 2 tbsp)) lukewarm water
- 3,5 g (1 ⅛ teaspoon) instant yeast
- 1 tablespoon olive oil or any other light oil
- 325 g (2 ⅝ cup) strong white bread flour
- 1 teaspoon salt
- 1 tablespoon unsweetened almond milk for brushing only
FOR THE FILLING
- 60 g (¼ cup) vegan butter
- 8 cloves garlic
- 1 teaspoon dried parsley
- 2 tablespoon dried thyme
- 6 tablespoon fresh coriander
- 7 tablespoon fresh basil
- ½ teaspoon salt
INSTRUCTIONS
FOR THE BREAD
- Combine the warm water and yeast in a large bowl.
- Add oil, flour, and lastly salt (on top of the flour).
- Stir the mixture until it comes together to form a rough dough.
- Turn the dough out onto a floured surface and knead for 5-10 minutes until it springs back when touched. Shape into a ball.
- Place the dough into an oiled bowl. Cover with a damp cloth and leave to rise for an hour (or until doubled in size).
- In the meantime prepare your filling (instructions in the Filling section below).
- Once risen, turn out your dough onto a floured surface and use your fists to knock the air out of the dough (for 5-10 seconds).
- Shape the dough into a rough rectangle and then roll into a thin rectangle (aim at roughly about 0.5-1 cm thick, 35 cm long and 20cm wide - US measurements 0.4x14x8 inch).
- Spread the filling equally over the dough.
- You want a thick and short roll so start rolling the dough on one of the short sides.
- Once rolled, cut a slit down the middle of the roll, leaving the top part uncut.
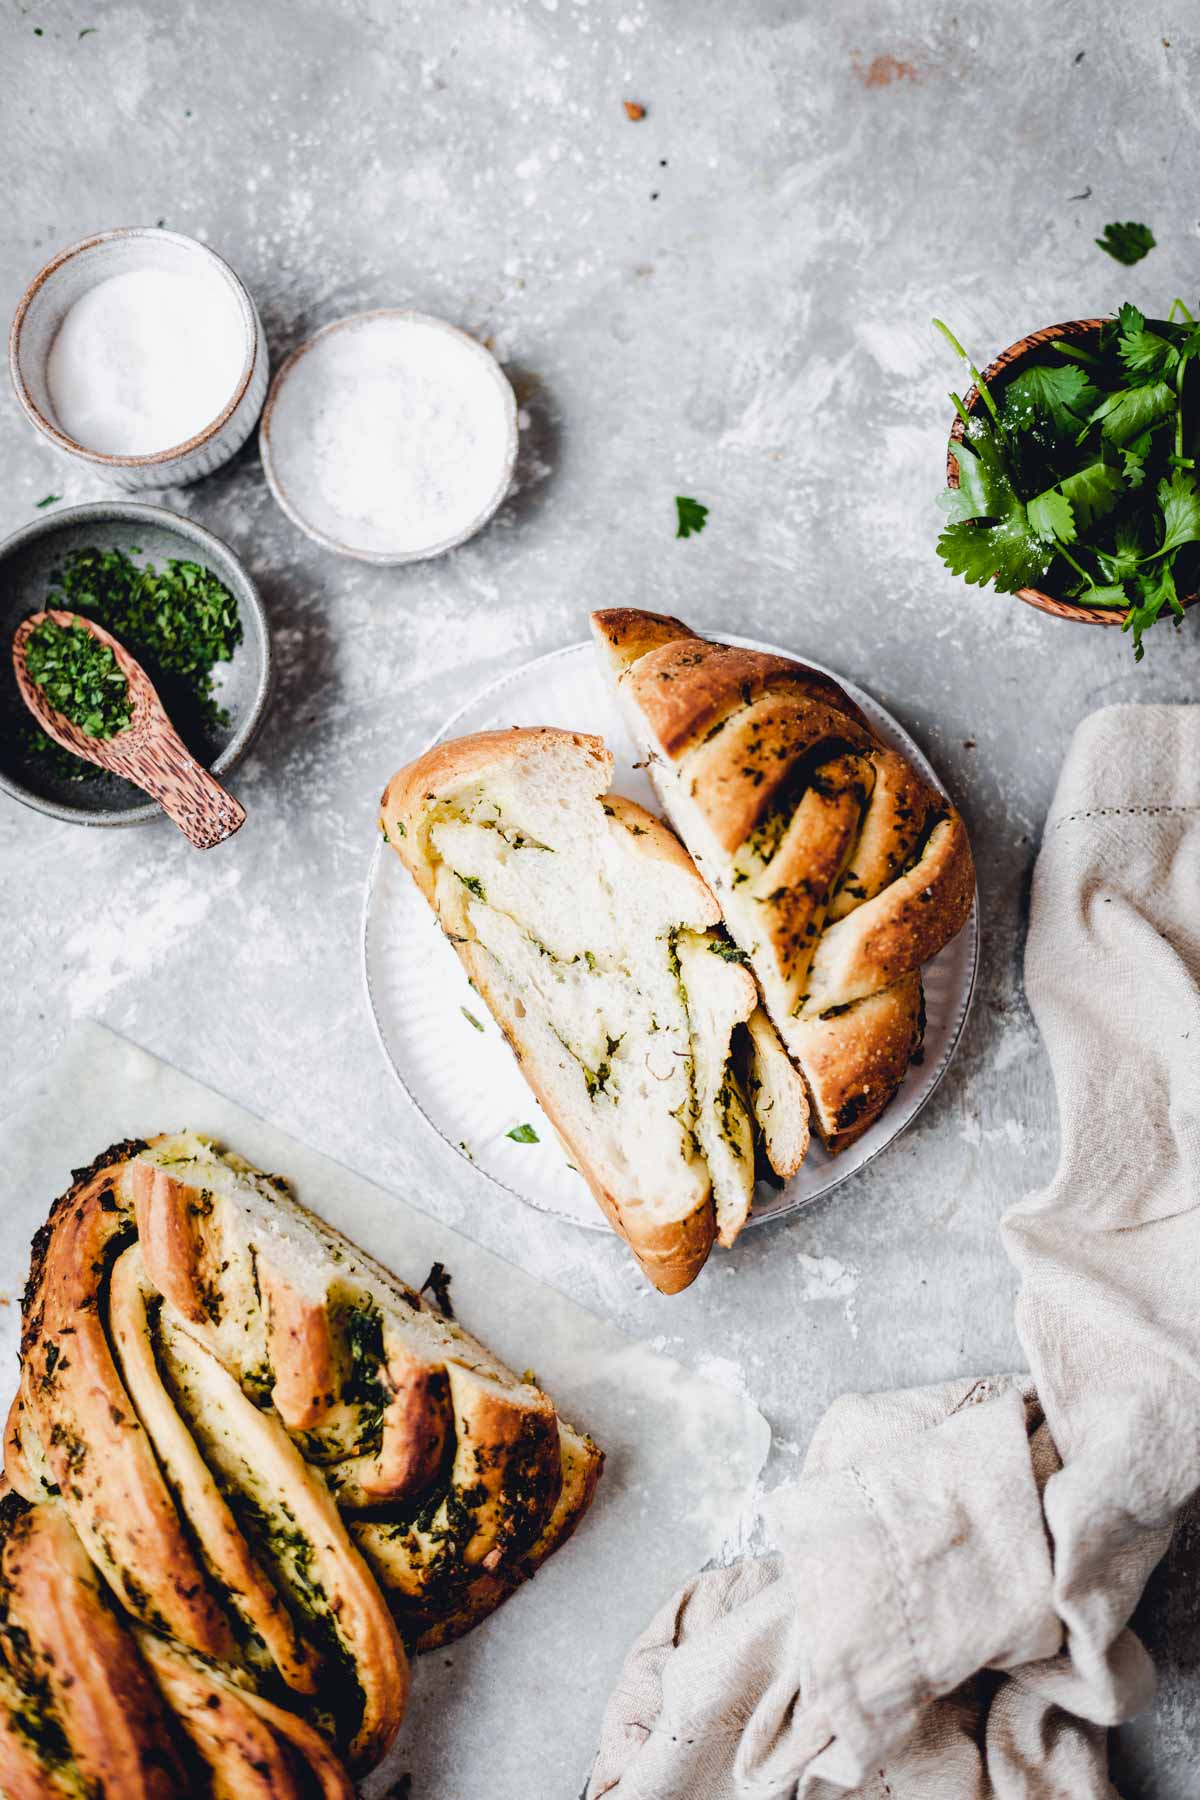
- Turn the filling to the outside. Then fold one strand over the other and repeat until you've reached the bottom. Keep the filling exposed (you want to see those beautiful layers).
- Finish by pinching the bread together at the bottom of the twist. Tuck the pinched bit under the loaf.
- Place the loaf on a baking tray for a final proof of 45 minutes.
- Whilst the loaf is proofing pre-heat your oven to 190°C / 374°F - fan oven setting. If you're not using a fan oven, bake at 210°C / 410°F.
- Once the loaf has proofed brush it with almond milk and bake for 30-35 minutes until golden brown and crispy.
FOR THE FILLING
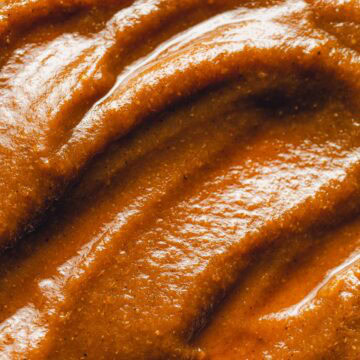
- Place all the filling ingredients into a food processor or blender and mix until a rough paste has formed.
- If you have no food processor (or blender), you can mix the filling ingredients by hand using a fork. Simply press down the dairy-free butter until it's creamier and then stir vigorously to mix all the ingredients well. Cutting the fresh herbs very thinly will help make the mixing easier.
Notes
- Use bread flour. Bread flour is higher in protein and will have better gluten development, resulting in a fluffy, well-shaped bread. Plain flour will build up less stretch in the dough and will cause the dough to tear when baked.
- Keep the salt and yeast separate until you start mixing.
- Hot temperature will kill the yeast so make sure to use lukewarm (not hot) water.
- Pinch the end of your dough tightly and tuck under. The pinch and fold will prevent the twist from unravelling so it's key to creating that lovely twist shape.
Nutrition
Disclaimer: The nutritional information above is calculated automatically. The author of this post cannot guarantee 100% accuracy of this data.

Green says
Hi vegan minimalist , can I use 'fast action dried yeast? .
Tajda Ferko says
Hi, yes, I think you should be fine. When using different types of yeast than given in the recipe I would suggest keeping an eye on the size of your bread when it's rising - it might rise slower or faster depending on the type of yeast. You will need to make sure it's doubled in size after your first rise. You can use the step-by-step photos to see how it should look after the second rise - big and 'fluffy'. Hope this helps! Would love to know how it turned out! x
Murphy says
Excellent! Used half parsley & half basil
Looks so impressive but not too hard to make
Tajda Ferko says
Ahh that's amazing, thank you so much for sharing Murphy! Excited to hear that it worked well with half pasrsley & half basil. Have a lovely weekend! x
Aashmi Joshi says
Hi, can I use all purpose instead of bread flour?
Tajda Ferko says
Hi Aashmi, thanks for reaching out! You can certainly use all-purpose flour, however it might not bring the same results. This is because there is less gluten in all-purpose flour compared to bread flour, which means your bread will be less airy & less fluffy. It might end up being a bit more crumbly overall, but definitely still edible of course. I hope this answers your question but definitely get in touch if you have any additional questions. Good luck and have a lovely rest of the week x
Heather says
Can I cold proof/retard the bread the night before?
Tajda Ferko says
Hi Heather, thanks for the question! I've never tried doing it this way before, so wouldn't be able to 100% guarantee it will turn out the same way. However, having done this with other breads before I would recommend to proof it as a dough, not as a finished/braided loaf. I would place it in the fridge overnight and then braid the the next day. Hope this helps! If you do try it out, I would LOVE to know the results so that I can update the recipe with this tip 🙂 xx
Andrea E says
The bread is delicious and turned out beautifully...with a few changes. I assume the herbs were measured as dried herbs, but I used fresh ones. Really 7T of dried basil is a LOT. I used about 1/3c fresh as well as rosemary, and a bit of thyme. Coriander seems odd in this context, so none of that. Mainly I want to say that I mixed the herbs with about a tspn of olive oil and a Tbsp of vegan butter which was plenty to spread over the dough. Definitely will make it again.
Tajda Ferko says
Hi Andrea. Thank you so much for pointing this out for me, I really appreciate it. I mistakenly thought that the ingredients image would make it clear that basil and coriander should be fresh and the rest dried. But it definitely wasn't clear enough, so I've updated the recipe with these additional details. Thanks for your lovely review and have a fab day x
Kelly says
HANDS DOWN the best garlic bread I've tried, both vegan and non vegan. So much tastier than regular garlic bread. All the herbs work beautifully. A new staple recipe for me!
Tajda Ferko says
Thank you so much Kelly! Glad it worked so well for you! x
Rachel says
This bread is SO good and super simple to make! I had never made a twisted bread before but the pictures in this recipe walk you right through it. I’m American so none of my measurements were exact following this recipe and it still turned out great, so don’t be scared off if the measurements are unfamiliar 🙂
Tajda Ferko says
Aw thank you so much Rachel, glad to hear it worked so well! If you click on 'US customary' under the ingredients list it will convert all the measurements into cups! 🙂
Claire says
This was absolutely delicious! I followed the recipe exactly, besides using oregano and Italian seasoning as the dried herbs. Turned out so fluffy and garlicky. Thanks for the recipe!
Tajda Ferko says
So glad you enjoyed it, Claire! Thanks for the lovely review xx
Gary Lewis says
Hiya
I came accross your site whilst looking for advice on photographing food.
It was a win win as my family eat a vegan diet plus we live in Manchester so that's great too.
I had a go at baking this bread. We were blown away by the results that much so I baked another two days later............. plus another the following week 🙂
Photography wise I took photos of it which turned out ok. I'm finding it much easier taking images in the darker style. The light and airy style I find difficult.
The hardest part for me is creating a scene with other elements in the shot.
Many thanks for sharing.
Gary
Tajda Ferko says
Gary, thank you so much for this wonderful comment - it genuinely made my day! How lovely that you live in Manchester too (although the weather has been terrible lately, hasn't it). There are lots of brilliant free resources if you're looking to practice light & airy food photography. Have you checked out The Bite Shot on YouTube? Foodtography School is a great course too. Thanks again for the kind review! x
Gary says
Hi Tajda
Thanks for your reply. Yes I have watched many video's on The Bite Shot Channel.
She is so very talented, as you say Joanie provides a wealth of free information.
I have just purchased some backdrops from Black Velvet Styling which also as some great information. I'm sure you will have heard of them.
I'll look into the course.
Thanks again.
Gary
LA says
This recipe is incredible! My dough didn’t quite rise 2x the size, but it still turned out amazing!!!! I took some liberties with the herbs and added rosemary, there’s a lot of room to play around to your taste. I usually am nervous converting to metric, but everything was accurate! The perfect recipe for Holidays, entertaining, potlucks, you name it! Can’t wait to try this with fresh garden herbs this summer.
Tajda Ferko says
Thank you so much for such a lovely review!! Definitely put a smile on my face! Glad you enjoyed it and rosemary sounds like such a good addition - I might have to try that out this weekend.
Chloe says
I'm in love with baking, baking bread, garlic bread, and good ingredients, and this recipe delivers on all fronts. I love the tiny details that are included in this. This was a really easy recipe to follow, especially with the pictures included. I felt confident going into baking this after I read through it.
I currently have 3 of this bread in the oven, it's been baking for about 15 minutes so far, and the smell of this kitchen is indescribable. I get why you say it's a show-stopper.
I'm going to take pictures of this when it's out of the oven.. I feel like it'll be a crime to eat it since it's so beautiful 😂
Thank you vegan minimalist, you've helped me many times with many different recipes over my 3.5 years of being vegan with my boyfriend. Thank you 🎉🎉🎉🎉
Tajda Ferko says
This comment just entirely made my day!!! 🥹🥹 Makes me so happy to read you've enjoyed multiple recipes on here. Thank you so much for supporting this blog - truly means the world to me! PS - Slightly jealous of your fresh three bread loves and now might have to make some myself hehe.
Karen says
This bread is the best bread I've ever made. Thank you for such a glorious recipe!
Tajda Ferko says
That's great to hear, thank you so much Karen!